• Photography
  • Interviews
  • Business
  • Reviews

Tiffinbox

Inspiring Photographers

  • Home
  • About
  • Blog
  • Contact

Mastering The Fujifilm X100T With Peter Fauland

February 17, 2016 by Seshu | Editor & Publisher

Lacking A Manual

In late 2014, right before Christmas, I gave myself a well-earned Christmas gift – a Fujifilm X100T. I remember excitedly opening the small box the camera came in and then frantically looking for instructions on how to set it up and how to operate it.

Honestly, I was frustrated. After shooting with a Nikon D700 for almost five years, I was expecting this new Fujifilm X100T to be easier to use. In some respects, it was. But I was reading other photographers on online forums discuss how one could program the Function button in a variety of ways or that it was possible to completely silence the camera.

I was lost. Like all new tools, I experienced a learning curve. Thank God for Eric Francis and Patrick Downs of the Fujinistas forum on Facebook. At every turn they patiently explained the nuances of the new camera (which by the way includes a fixed 23mm f/2 lens). But I knew I couldn't keep pestering them (well, I still do), so I went on a quest to find a resource that explained the intricacies of using the Fujifilm X100T.

The included manual was quite useless and it made me wonder why Fujifilm would almost intentionally leave photographers in the cold with all that this camera was supposed to be able to do. I was imagining myself photographing people in the middle of a bright day, using an off-camera flash or the built in ND filters. But every time I poked around the camera, clicking on buttons and menus, I just got more lost.

Another Resource

So, Google to the rescue. I stumbled upon a forthcoming book by German photographer, Peter Fauland called Mastering The Fujifilm X100T & X100S. It's published by Rocky Nook and you can also order the book from Amazon.

I tracked Peter Fauland down in Berlin, to chat with him about his new book and to ask him a few pressing questions about my current challenges using the phenomenal Fujifilm X100T camera.

My Experience With The X100T

As I said, I've been photographing with the Fujifilm X100T since November 2014. I could have given up and sent the camera back to B&H Photo Video, but I chose to stick with it and simply use the camera as often as possible. If you see me walking around town, you probably have seen me stop and photograph whatever it is that I am experiencing in front of me. The Fujifilm X100T is the perfect “about-town” camera, but it also performs well in professional settings as well. Due to its quiet shutter option, I can photograph in situations where my Nikon D700 would otherwise raise eye brows. About a month back, I bought a used Nissin i40 flash from Neil van Niekerk and have started using it on the Fujifilm X100T.
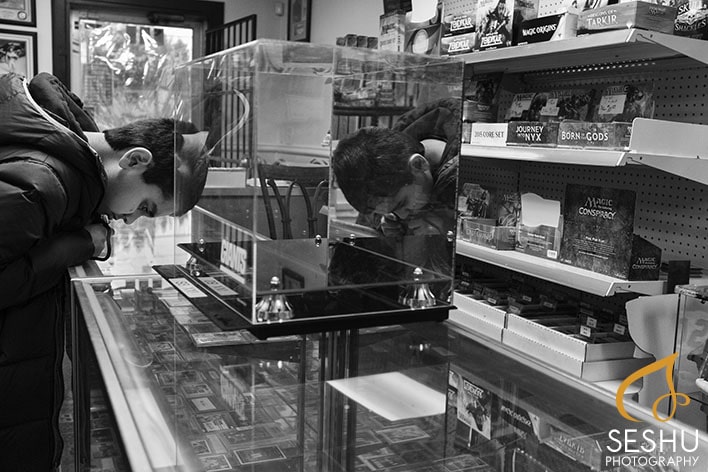
Buying NFL Trading Cards | Canton, Connecticut | Fujifilm X100T

Yes, the photograph above was shot using my Fujifilm X100T. Could I have used my Nikon D700 and a Sigma 35 f/1.4. Yes! But … the X100T allowed me to work quickly and without causing the kid to take notice. It was also on silent mode. Even the shopkeeper didn't realize I had made about 10 images. For more Fujifilm X100T photographs, visit my website – Seshu Photography – in about 10 days or less, I will have a new section celebrating my success in creating documentary family portraits and other images.

Other Books To Consider

Fujifilm X100S: From Snapshots to Great Shots, by Kevin Mullins
A Short Course In The Classic Art of FujiFilm X100T Photography, by Dennis P. Curtin

Filed Under: Home Middle Left, Interviews, Photo Gear, Photo Technology, Photography Tagged With: D700, fujifilm, fujifilm cameras, Fujifilm X-mount, Fujifilm X-series, Fujifilm X100, Fujifilm X100s, nikon, Nikon D700, Nikon D700 Digital Camera

Will You Switch To Medium Format Cameras?

January 8, 2013 by Doug Levy

Doug Levy is a photographer based in Ayer, MA. He shoots weddings and portraits. Check out his blog. Check out Doug’s first guest blog post about second shooting weddings. Doug will be teaching classes about his lighting techniques and the business of photography at Inspire Photo Seminars. Follow him on Twitter.

When wedding season starts to slow down, I start to look for interesting projects to shoot during the slower time of year. One thing I’d wondered about for years was the holy grail of cameras, medium format digital. Now, I should preface this with the fact that I’ve never shot medium format anything, let alone digital. My first “real” camera was a Nikon D70s in 2006 and I’ve shot exactly one roll of film since then, on my wife’s old plastic 35mm Nikon, and that took me six months to finish.

One portrait I’d had rolling around in my head for a while was to take a few minutes to introduce myself to Bob, owner of B&J Cycles, a Harley Davidson repair shop on my street. I thought a photo of Bob would be the perfect opportunity to test out a medium format system, so I called Derrick Brown at Imagelink to see if I might be able to rent a camera and back for a few days. I’ve been using Derrick’s calibration software for years, and we have a mutual friend, but despite his being just down the road, I’d never had the chance to meet him in person until recently.

Doug Levy Medium Format Portrait

When I called Derrick up he immediately invited me over to his studio, where we spent a couple hours discussing the options in the current medium format digital world, and ended with him offering to loan me a Hasselblad H2 and Phase One P25 back for a weekend. I suspect he knew I wasn’t going to be shelling out $20k+ anytime soon for a new IQ system, but that the used price of a P25 ($5,000-$6,000) was something I could probably pull off.

And it’s true, with a few months of careful budgeting, I probably could have afforded to pick up a used P25 system, and I even spent a few hours one afternoon looking around on eBay to gauge the market.

But here’s what I didn’t expect. While there were a lot of things to like about the H2 and P25 combo (1/800 flash sync, a gorgeous gigantic viewfinder, autofocus that was better than I’d expected, true 16-bit color), the back was beyond unusable to judge color, focus or exposure unless you shot tethered. It really makes you appreciate how far camera and LCD technology has come in a short time.

As 95 percent of the work I do is on location, and about 90 percent of that takes place in situations where tethering is either impractical or outright impossible, shooting the P25 was essentially equivalent to shooting film. By that I mean that you don’t know what you have until you’re back at your desk reviewing the files.

Now that doesn’t mean I had a horrible weekend with the camera, far from it in fact. I shot a couple hundred photos with it, and it’s an absolute joy to use. The ergonomics are well thought out and I managed its hefty weight quite well. The larger finder made manual focus fine tuning a breeze and the Hasselblad HC 80mm lens Derrick loaned me ranks up there with Nikon’s 200mm F/2 as the sharpest I’ve ever used. And when you do make it back to the computer, the files at ISO 50 and 100 are stunning in their depth and clarity.

This was probably an unfair comparison, to pit a camera that was at the top of the line in 2004 against my daily driver, the Nikon D4, but as someone who makes my living with my camera, I had to ask myself if my wedding and corporate clients would really see the difference between the cameras, and the answer to that is a resounding: “not a chance.”

That’s not to say that when Powerball hit half a billion dollars the week after I returned the camera that I wasn’t already building a brand new Phase system in my head (because I was), but until the current backs with their gorgeous iPhone-like screens drop into the sub-$10k used market, I’ll stick with my 35mm Nikon system.

So, will you give medium format its due? Do you work in medium format now? Chime in with a comment below. Thank you!

Filed Under: Photo Technology Tagged With: camera, doug levy, medium format, Medium Format Cameras, nikon

Why Calibrating Your Camera’s Lenses Is A Must For All Photographers

June 19, 2012 by Wes Kauffman

Wes Kauffman is the President and Lead Technician at Perfect Image Camera, an independent camera repair center located in Lancaster, PA. Perfect Image has been providing professional camera repair service to the amateur, advanced amateur and professional photographic community for over 30 years.

“There are only two guarantees in life, Death and Taxes.” – Ben Franklin

I could not disagree more with the above statement. There are three guaranteed things in life. Death, taxes, and the fact that 90% of the lenses you buy will not focus properly on your camera. As a camera repair technician I am continuously hearing photographers complain about soft images. Either their lenses used to be sharp and now are not, or they just never performed up to their expectations. The truth is they are right, their lenses are not sharp, no matter how expensive, how new, or how well they take care of their lenses. Taking a camera and lens off the shelf, putting them together and getting perfectly sharp images is just not likely.

The reason is simple. Manufacturing relies on producing a high quality product, not a perfect product. Could Canon and Nikon produce perfectly matched cameras and lenses? Yes, but none of us could afford them. So in order to keep cost down they manufacture equipment to fall within “Allowable Tolerances”. In other words if a lens back focuses just a little, or a camera front focuses a tiny bit that is ok, because the amount of time and money it would take to get things perfect is just not worth it.

So, what’s a photographer to do? Thankfully the answer is really quite simple, Micro-Adjust (for the Canon lover), and AF Fine Tune (for all you Nikonians out there). Essentially what the manufacturers have come up with is a software solution. The process goes like this. We take a camera and lens that are having front or back focus issues, test them on an AF adjustment tool, enter the correct adjustment into the camera and voila we have a camera and lens combo that focus correctly. Now in real life it takes a little more work than that, but you get the idea. In my opinion the most practical and well thought out feature in newer DSLR’s is the AF Calibration feature. Very few technical advances have had such a profound impact on image quality as this one tool.

Perfect Image Lens Calibration

Now I’m going to be honest with you. Calibrating your camera is something you can do yourself, some of my customers do, and some of my customers try. The truth is a qualified repair tech can do it faster, and probably more accurately. They will have the correct tools and more importantly the experience. You also need to keep in mind that not all camera models have the AF Calibration feature built in. Here is a list of current cameras that can be calibrated.

Canon and Nikon

Nikon and Canon DSLR Bodies That Can Be Cleaned at Perfect Image Camera, Inc.

Sometimes calibration is not the answer to focus issues you might be having. Often times, (especially in Canon lenses) the USM (ultrasonic motor) unit in the lenses can go bad. If you have a Canon USM lens and the focus “seeks” (goes in and out without locking focus), or is very erratic (i.e. will back focus one moment and front focus the next) you need a repair not just a calibration. Nikon lenses don’t have the problem as frequently, but it still does occur. I always check a lens for these problems before I even begin the calibration process. If your lens does need repair please keep in mind that once the repair is complete it should still be calibrated with your camera.

Perfect Image Lens Calibration

So to wrap things up, your images are soft, guaranteed! Well 90% guaranteed anyway. Thankfully there is a solution and I can help you with it. Check out my website www.perfectimagerepair.com or click here to order your calibration service today.

Perfect Image is committed to being the solution to all your camera repair or professional sensor cleaning needs. Use the following code: “tiffinbox” and receive a $5 discount off of calibration or sensor cleaning from Perfect Image Camera.

Filed Under: Photo Gear, Photo Technology Tagged With: calibrate, camera, camera and lens, digital photography, digital single lens reflex camera, image lens, images cameras, lenses, nikon, optics, perfect image, photographic lens, Photography, sharp images, technology, usm lens

Mark Wallace’s Speedlights 101 At CreativeLive

May 14, 2012 by Seshu | Editor & Publisher

Ever since Mark Wallace picked my name out of a hat to win a pair of PocketWizard Mini TT1/Flex TT5 units, I have been a fan of his.

Just kidding.

I always enjoy the way Mark teaches photography, especially lighting. His technical acumen about big studio lights or little on or off-camera speedlights is phenomenal.

While his YouTube channel is full of great videos explaining how he uses light, from May 18 through the 20th, he is going to be doing a bit of a brain dump through CreativeLive. So, sitting in the comfort of your home, you can tune in online to view Mark talk about Speedlights for FREE. On those days alone, it is a live event.

I have watched and bought several CreativeLIVE courses and they are all very well produced. Also, knowing Mark, I expect his attention to detail and his dedication to teaching to come through. What's truly awesome about CreativeLIVE is, as it is happening, you can ask the instructor questions or comment on what you are learning. You do need a Twitter account and the right hashtag to do so. If you enroll now for Mark's class, I am sure you will be emailed some instructions on what to do.

If you can't make the online event or the nightly re-broadcasting of the show, then you can buy the download for $99 – a small investment for your business or hobby. If you know the in's and out's of using your speedlights this course may not be a good fit for you. But if you are like me who wants to know all the functions, say, a Nikon SB900 provides, then I would recommend tuning in (hey, it's FREE) on May 18th, 19th and 20th.

If you miss Mark's CreativeLIVE presentations, you can hopefully catch him during one of his photography workshops this year. He is going to start in his hometown of Phoenix, then goes to Seattle, Los Angeles, New York, Dallas, Miami and Houston. Other cities may be added to the list. So, keep an eye out for that on his workshop site. Mark is offering 4 distinct workshops at each stop. Check them out! I hope to go to the ones in New York, unless of course, he decides to bring the workshop to Boston, or better yet, to Hartford, Connecticut.

Filed Under: Lighting, Off-Camera Flash, Photography, Reviews, Workshops Tagged With: flash photography, mark wallace, nikon, photographic lighting, pocketwizard, speedlight, speedlights, studio lighting, Teaching, teaching photography

Post-processing Digital Images With Visual Supply Company’s Presets For LR & ACR

November 27, 2011 by Seshu | Editor & Publisher

As a portrait and wedding photographer, it's awfully tempting to jump on the latest shining thing that comes along that claims to cut post-processing time down by a significant margin.

After all, what would you rather do, have the time to photograph or sit there in front of your machine for hours processing images? No one I know has opted to do the latter. It just wouldn't make sense to them. So, the search for that holy grail continues.

MY POST-PROCESSING WORKFLOW

My process after an event, be it a portrait session or a wedding, is to download my images off of my CF cards (for the curious, I use Sandisk 8gb Extreme III's). I cull my images in PhotoMechanic, as it allows me to quickly view my raw files and then I mark the ones I want to keep. The ones I edit out are moved into a different folder and out of sight. I then edit images in either Lightroom or Photoshop, depending on how many images there are in the “process” folder. Choices, choices. In the past, I would chug through a wedding with more 1500 images to edit. Lately, I have been thinking of sending them out to Colorati and having them tweak the images for me.

PRESETS FOR AND BY PHOTOGRAPHERS

Visual Supply Company PresetsThere is however one other option. Yes, that bright and shiny thing I mentioned earlier on. It's called Visual Supply Company, or VSCO. If you use Nikon or Canon cameras and you shoot RAW files, your ears should perk up about now. Once you've imported your raw files into Lightroom or Photoshop's Adobe Camera Raw, you are able to apply presets based on your camera's profiles. So Nikon users would use Nikon presets and Canon users would use Canon presets. A select number of Nikon and Canon cameras were used to test these presets to create custom profiles. From what I have been told, the company will continue to add more profiles as they are tested and as newer cameras come into the market. I personally like this progressive aspect of the company a lot. Here is the current list of cameras that have been profiled so far.

FIRST STEPS

From my experience with the presets (which I bought), I needed to have correctly exposed and white balanced images before beginning to work with the presets. So, that should be your first step (getting the exposure right in the camera) and then batch correcting the white-balance, if you have that option after you get home.

EMULATE THE LOOK OF FILM

I don't know about you, but I started out in photography using film. I have shot untold number of rolls of Kodak Tri-X and T-Max 3200. I miss the rich, textures that digital files have all but obliterated. Yes, in the words of Jonathan Canlas or Kirk Mastin (both awesome film-only photographers), I could pick up a film camera again instead of making a digital file look like film. They have a point. Yes, I could do that. But VSCO gives me the opportunity to emulate the look of film without the added expense of working in that wonderful medium. For me, it's really the best of both worlds.

BLACK & WHITE EXAMPLE

>Straight Out Of Camera, or SOOC

Couple In West Hartford Library - VSCO | Straight Out Of Camera Image

>First Tweak – Just Clicked on the TriX-400++ Preset

West Hartford Portrait Session | Visual Supply Company TriX-400++ Preset

>Second Tweak – Used the Vignette++ Preset

West Hartford Library Portrait Session | Visual Supply Company Vignette++ Preset

>Third Tweak – Used the Dark Skies+ Preset (notice how the t-shirt in this is darker?)

West Hartford Couple Portrait Session | Visual Supply Company Dark Skies+ Preset

So, in three clicks, I arrived at what I consider to be an acceptable final image, ready to be shared with my clients. The images will definitely go through another round of tweaks, in Photoshop if the clients were to order this image.

COLOR EXAMPLE

>Straight Out Of Camera, or SOOC

Senior Portrait Session In Canton, Connecticut | Straight Out Of Camera

>First Tweak – Clicked on the Kodak Portra and Contrast++ presets

Portrait Session In Canton, Connecticut | Visual Supply Company Kodak Portra & Contrast++ Presets

>Second Tweak – With the above image being a little “hot” in the highlights, I used the “recovery” slider to bring back some highlight detail.

High School Senior Portrait Session In Canton, Connecticut | Visual Supply Company Recovery Slider

>The Final Image – Took this image into Photoshop and used brushes to smoothen out natural blemishes, bring some light back into the eyes and sharpen the image up.

Final Image From Senior Portrait Session In Canton, Connecticut | Tweaking Images In Photoshop

For both sets of images, I used the Visual Supply Company Studio Version. I also processed the images in ACR. With the processing engines the same in both ACR and LR, sometimes it is more convenient to fire up ACR (for a small set of images) versus Lightroom (which I use for image sets that are 100 or more). Wanting to emulate the film look, I was more enamored by the way VSCO's Film helped me produce black and white images. In fact, I might use this almost exclusively to create black & white prints for my clients.

IS THIS FOR EVERYONE?

In one quick answer, no. It's not. I would recommend you look at your needs first. Figure out whether your clients (if you are a professional) would not just see but also appreciate the look you will be producing for them. If you are an amateur or hobbyist, just looking to create images with a different look, these presets will help you achieve that. Let me put to you even more simply – if you are inclined to produce images that you want people to merely look at, then you should pass on this. However, if you are the type of photographer who wants your viewers to dip into a well of emotion and feel the image, then you should definitely buy these now.

THE SWEET DEAL THAT ENDS ON NOVEMBER 29th!

Until Monday night (that's tomorrow night), you can get the Standard, Pro and Studio versions for quite a bit off of their regular prices. I bought the Studio version as it includes both the Lightroom and ACR options for both Nikon and Canon cameras. In the event I work with a photographer who shoots with a Canon system, I can now very easily tweak her/his images as well. If your business is primarily shooting portraits, I would nudge you more towards the Pro version.

From Visual Supply Company's Twitter feed:

“All prices will increase after Monday at midnight PST #VSCOFILM. Standard $59 will be $79, Pro $99 will be $119 & Studio $179 will be $199.”

STILL NOT CONVINCED?

You should also read John Keatley's review of Visual Supply Company's Presets. And Jonas Peterson's review too. Just look at the images they have on display.

SHARE YOUR IMAGES

If you bought the Visual Supply Company presets, please share your images with me and tell me in the comments sections below which presets you liked the most. Do you use other

Disclosure of Material Connection

Filed Under: Photography Workflow Tagged With: acr, adobe photoshop, adobe photoshop lightroom, canon camera, computer graphics, digital negative, digital photography, Film, film cameras, film emulation, graphics file formats, graphics software, lightroom, nikon, Photographers, preset, process imaging, raster graphics editors, raw image format, visual, visual supply company

  • 1
  • 2
  • Next Page »

Subscribe To Tiffibox Treats!

Looking for a well-curated email newsletter that will leave you inspired and motivated about your photography business? Sign up below!

About Seshu

Seshu creates relaxed portraits of families and high school seniors in Avon, Connecticut. He also leads a successful headshot photography studio in Connecticut, helping professionals from a variety of disciplines project the very best versions of themselves. He created Tiffinbox as a way of inspiring photographers, to create better images and successful businesses. [Read More]

Email Templates For Headshot Photographers

Email Templates for Headshot Photographers

Recent Posts

  • How Capture One Changed My Event Photography
  • 10 Steps To Stay Positive In Times Of Great Stress
  • Why You Need To Read “Personal Branding For Photographers” Now
  • How To Master Your Website Content Step By Step?
  • Tony Taafe’s TNT Method For Headshot Photographers

Recent Comments

  • Stephen Davison on Are You A Business Owner Who Is Smart, But Stuck?
  • Ben A. on Don Giannatti Clinches The 8th Annual Tiffinbox Award
  • Dan on Don Giannatti Clinches The 8th Annual Tiffinbox Award
  • Donald Giannatti on Don Giannatti Clinches The 8th Annual Tiffinbox Award
  • Stephen Davison on G.E. Masana’s 6 Strategies For Wedding Photography Success
  • Naveen Kumar on Weddings In India Are More Than Being At The Right Place And At The Right Time
  • kartick on Weddings In India Are More Than Being At The Right Place And At The Right Time
  • Leonid Farbman on 6 Uncommon Trends To Grow Your Photography Business
  • Willow and Finch Wedding Photography on 11 Reception Tips To Help Your Wedding Photography
  • Web Designer Malaysia on How To Optimize Your Squarespace Website For Search Engines
  • Creastan on An Interview With Photojournalist G.M.B. Akash
  • Cindy Brown | Atlanta on An Open Letter To A Local Photographer

Become a Patron!

Copyright © 2026 · Tiffinbox · Site Design by Heather Mackan Creative · Built on Genesis