• Photography
  • Interviews
  • Business
  • Reviews

Tiffinbox

Inspiring Photographers

  • Home
  • About
  • Blog
  • Contact

Using Sexy Light On The Beach

July 14, 2014 by MP Singh

Behind The Scene Look: How I Got That Shot

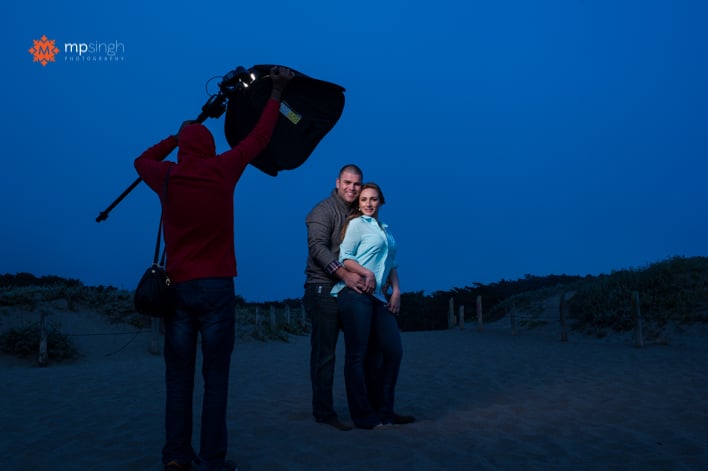
The image you see below was created as part of an engagement session. It was towards the end of shoot when we were at a beach and sun had already gone down. The park visiting hours were already over and there was a cop driving everyone out. And it was cold, the chill factor in the wind was sending shivers down our spines. We quickly grabbed couple of shots and drove out of the park.
MPSingh Photography - Couple On The Beach

This shot was taken with the help of an off camera flash, Nikon SB900 inside a Lastolite 24″x24″ softbox, triggered with my trusted Pocket Wizards. The following is a lighting diagram showing the set up for this shoot.
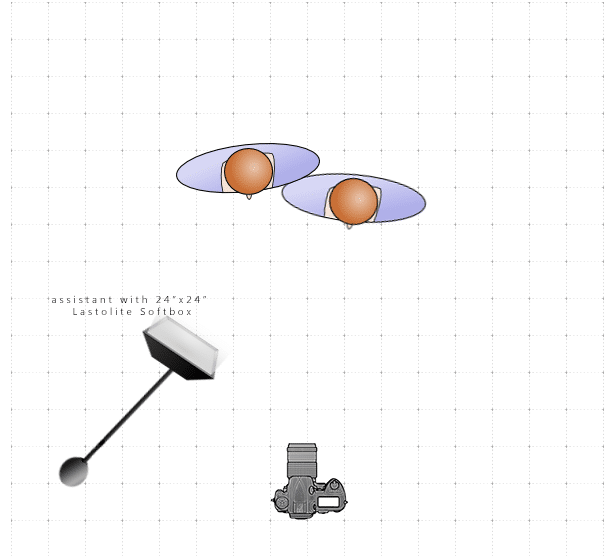
MPSingh Photography - Couple On The Beach Lighting Diagram

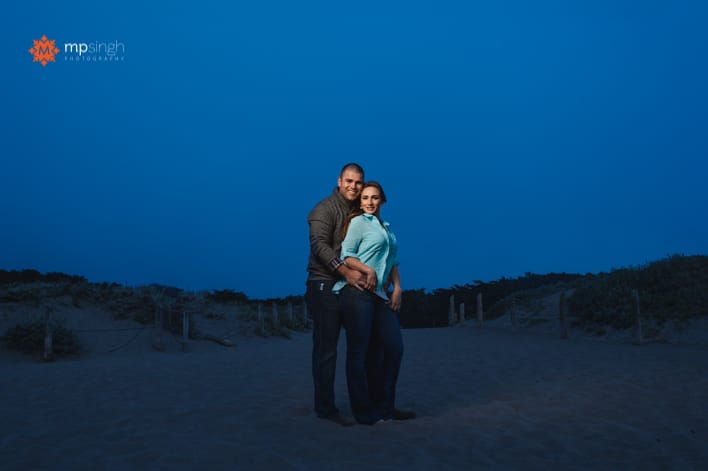
The flash had a full cut CTO (color temperature orange) gel on it. I wanted to give the feel for the post dusk bluish night sky. So I turned my camera to tungsten white balance. This gives the blue tint to the whole image. To compensate the blue tone on the subjects and bring the skin color back to normal yellow/orange tones, the flash had the orange gel on it. The full cut CTO gel fully compensates for the tungsten white balance.

Another challenge was that we required the light to be very close to the couple and we wanted wide angle shot to include more of the background for context. So the assistant was in the picture.
MPSingh Photography - Couple On The Beach

The Photoshop Work

To fix that we took two shots, one with assistant lighting the couple and in the shot. Before the second shot, the assistant ran out of frame and switched off the light. So the second shot was taken with the couple without any light. Once we take these two shots it is very easy to do a composite in Photoshop:

1. Open both the images in Photoshop as layers, with the image with assistant as the top layer.

2. Auto align layers (Edit –> Auto-Align). When we don't use a tripod there is always a slight movement of the camera and the frame changes. To compensate for that, we have to align the layers.

3. Once the layers are aligned, select the top layer and use layer mask to mask out the assistant. Now we are using everything else from this layer except area where assistant was. That area is picked up from the layer beneath.

4. Make other changes as required.

And, voilá, we have our final image. Do you have any questions? Feel free to ask below!

Filed Under: Home Middle Right, Lighting, Photography Tagged With: adobe photoshop, camera flash, Color Gel, digital photography, Flash, image processing, Layers, off-camera flash, Orange Gel, photographic lighting

Mark Wallace’s Speedlights 101 At CreativeLive

May 14, 2012 by Seshu | Editor & Publisher

Ever since Mark Wallace picked my name out of a hat to win a pair of PocketWizard Mini TT1/Flex TT5 units, I have been a fan of his.

Just kidding.

I always enjoy the way Mark teaches photography, especially lighting. His technical acumen about big studio lights or little on or off-camera speedlights is phenomenal.

While his YouTube channel is full of great videos explaining how he uses light, from May 18 through the 20th, he is going to be doing a bit of a brain dump through CreativeLive. So, sitting in the comfort of your home, you can tune in online to view Mark talk about Speedlights for FREE. On those days alone, it is a live event.

I have watched and bought several CreativeLIVE courses and they are all very well produced. Also, knowing Mark, I expect his attention to detail and his dedication to teaching to come through. What's truly awesome about CreativeLIVE is, as it is happening, you can ask the instructor questions or comment on what you are learning. You do need a Twitter account and the right hashtag to do so. If you enroll now for Mark's class, I am sure you will be emailed some instructions on what to do.

If you can't make the online event or the nightly re-broadcasting of the show, then you can buy the download for $99 – a small investment for your business or hobby. If you know the in's and out's of using your speedlights this course may not be a good fit for you. But if you are like me who wants to know all the functions, say, a Nikon SB900 provides, then I would recommend tuning in (hey, it's FREE) on May 18th, 19th and 20th.

If you miss Mark's CreativeLIVE presentations, you can hopefully catch him during one of his photography workshops this year. He is going to start in his hometown of Phoenix, then goes to Seattle, Los Angeles, New York, Dallas, Miami and Houston. Other cities may be added to the list. So, keep an eye out for that on his workshop site. Mark is offering 4 distinct workshops at each stop. Check them out! I hope to go to the ones in New York, unless of course, he decides to bring the workshop to Boston, or better yet, to Hartford, Connecticut.

Filed Under: Lighting, Off-Camera Flash, Photography, Reviews, Workshops Tagged With: flash photography, mark wallace, nikon, photographic lighting, pocketwizard, speedlight, speedlights, studio lighting, Teaching, teaching photography

Off-Camera Lighting On Location

July 28, 2011 by Tony Urban

Today's guest blog is by Tony Urban, a photographer based in Western Pennsylvania. Tony specializes in High School Senior Portraiture. Please follow Tony on Twitter.

At least twice a week someone who has just learned that I'm a photographer responds to that information by telling me that their uncle/coworker/neighbor/dog walker/classmate/etc. is a photographer too. So how is a working, professional portrait artist with a legitimate business supposed to compete with all of the new shooters who are, quite often, working for free just because they “really like to take pictures”? There are several options, but one of them is to stop “taking” pictures and to start “making” portraits.

High School Senior In Front Of A Car

High Senior Posing On The Ground

The word photography, as most know, is based on the Greek words “photos” (meaning light) and “graphe” (meaning drawing) – drawing with light. Despite that, many senior photographers ignore lighting when it comes to creating their images and as a result, they produce a style that can easily be reproduced by anyone with a “fancy camera”. With the proliferation of natural light photographers, it's more important then ever to have a stye that will set your work apart.

I'm a full time senior portrait photographer and over the past 2 years I've transitioned from being a “natural light” shooter to a photographer who drags around lights on every senior photo shoot. It doesn't matter if we're hiking into the forest or wading into the lake – if I'm making the portrait, I'm lighting it too. We might be shooting in “God's Studio”, but we're using my light to create the image.

On one hand, my business has almost doubled from the time I changed from natural light to controlling the light.

I've spent way too much money on lighting equipment over the past few years. Small flashes, studio strobes, Pocket Wizards, Radio Poppers, light stands, boom arms, sand bags, power packs, etc. Sometimes I carry my gear, others I use a modified golf cart. I use translucent umbrellas, soft boxes, octoboxes and beauty dishes all outside while shooting on location. Not only does this gear take the portraits to a level that is unattainable by the guy who just bought a D5000 and opened up his business, but it gives my clients more of a “model” experience and makes them more excited about the shoot.

High School Senior In The Meadow With Her Horse

High School Senior Blowing Thistle Seeds

Is lighting a big deal to my senior portrait clients? On one hand, my business has almost doubled from the time I changed from natural light to controlling the light. On the other, not a single client has ever looked at their photos and said, “Wow, that's some beautiful lighting!” To the average client, I suspect good light is appreciated on a subconscious level. It makes them enjoy and appreciate the photos more, even if they aren't sure why.

If you're a professional photographer you really should understand the basics of studio lighting and taking the knowledge and using it outdoors isn't as intimidating as it first appears. Basically, you just have to compensate for the sun/ambient light (a light meter comes in handy with this) and, you have to deal with wind, rain and whatever else Mother Nature decides to toss your way.

The Strobist website is a fantastic resource and you'll find exhaustive amounts of information there about lighting. I haven't even begun to read a fraction of what is discussed there because I usually prefer to learn by doing rather than studying, but it should still be the first stop for any photographer looking to take their lights into the great outdoors.

High School Senior Gymnast

High School Senior - Splash The Dress Session

There's no magic bullet when it comes to lighting outside. Sometimes I use Nikon Speedlights and Radio Poppers. Sometimes I use White Lightning strobes and Pocket Wizards. Both have their pros and cons. Speedlights are lightweight and easily portable but might be lacking in power depending on what you want to do with them. Strobes have tons of power but can be bulky and you need to use portable power packs to run the lights.

Maybe even more important than the lights themselves is what you use to sculpt the light. I prefer Beauty Dishes as they typically give you the most “bang for your buck” in terms of power. I always use them with the diffusion sock on though to soft the light produced. I, personally, love soft light and find it flattering for most senior portrait clients. It's important that you don't get too caught up in “lighting” the portrait to remember all of the other technical areas which need to excel – the pose, the composition, the subject's expression, etc. You can create the most stunningly lit photo possible but your client isn't going to buy it if the pose makes them look chubby or if their smile is a little goofy. Portrait photography is about making your client look amazing and the lighting is just one part of that.

The best light you can use is simple – it's the one that gets the job done. Play with your lights, experiment, see what works best for you and your style of photography. Once you've mastered using one light outdoors, move on to 2 lights – or 3 or 4 – or go crazy like Joe McNally and use so many that you lose count. But when you're working with your seniors, remember that your goal is to make them look great. Use your lights to give them unique portraits that all of the weekend warriors wouldn't even try to create. Your lights can be another tool to take your work to the next level and to help your portrait business stand out amongst a rising sea of “shooters”.

Do you agree with Tony that lighting can be the biggest differentiator? Tell us how you distinguish your work from others? And if you enjoyed this post, please “Share The Knowledge” by clicking on one or more of the social media buttons you see below! Thank you.

Filed Under: Lighting, Photography Tagged With: camera lighting, Flash, light meter, Lighting, lighting equipment, location, natural lighting, photographic lighting, Photography, portrait photography, Portraits, senior portrait photographer, senior portraits, soft light, strobe light, studio lighting, tony urban

Quick And Simple Photo Shoots

June 24, 2011 by Dan Watkins

Today's guest blog is by Dan Watkins, a widely-published photographer based in Boston, Massachusetts. He is a frequent contributor to the Improper Bostonian. Follow him on Twitter.

I was recently on-location at a Boston restaurant, photographing some food to accompany a magazine piece, when the manager struck up conversation. He reminded me that, when scheduling the shoot, I had mentioned only needing about twenty or thirty minutes to photograph. He then said he was ‘curious' to see what I would produce in such a short time.

The word curious appears in quotes because the tone in his voice led me to believe he actually meant ‘skeptical'. After talking with him more, it turned out most photographers the restaurant had worked with previously did produce great images, but either took a really long time doing so or used so much lighting equipment and modifiers that it became a serious disruption to the restaurant's customers and staff.

This conversation made me realize that there must be something to the adages ‘keep it simple' and ‘less is more' – even when applied to photography. So how can one keep it quick and simple on shoots?

Plan Ahead

My 20-30 minute estimate was based on the fact that we would only be shooting one or two dishes and that I was going to shoot predominantly with available light (adding just an off-camera speedlite if necessary). Since I knew the dishes would need to be prepped, cooked and plated, I also knew I could use that time to check out the location, look for a few good angles to use as backgrounds, and start setting my camera and flash accordingly. I was confident that a half hour would be more than enough time to get plenty of options for the magazine.

Food Photography By Dan Watkins

Food Photography By Dan Watkins - Cocktail

Minimize Lighting Gear and Utilize Available Light Instead

There are instances where shooting with ambient light rather than relying heavily on additional equipment is okay. Sure it's fun to see what sort of stylized images you can create with a four-light or more setup, but that might be something better suited for personal work instead of a client shoot in a public space. Just because you've grown an arsenal of lighting and modifiers doesn't mean there's anything wrong with leaving them home and going back to basics now and then. Less equipment also means less to go wrong, allowing you to focus more on making great photos!

Know How to Control The Available Light

Using ambient light as a main light source isn't enough if you aren't sure how to make it work for you. Pay attention to the quality, color and direction of the light on location and use it to your advantage. For example: using your aperture to control how warm or cool a space lit with tungsten appears on camera, or angling subjects so windows behind them or to the side provide a nice rim-light to separate them from the background.

Food Photography By Dan Watkins - Salad

Food Photography By Dan Watkins - Main Meal

Trust Yourself

Many photographers are far too critical of themselves. While this mentality might have its advantages while editing down a portfolio, for example, it usually doesn't help while on a shoot. Part of the reason a client hires a professional photographer is for their eye. They trust you have the confidence to portray their subject effectively, and so should you.

Know When You've Got The Shot and Move On

Gut feelings play a part in other aspects of professional photography – from what clients we choose to work with, to negotiating creative fees – so there's no reason to ignore them on a shoot. If it feels like you've got the shot, you probably do. It's easy to feel the pressure to over deliver and keep photographing a subject from every possible angle to ensure the client has many options. Most clients, however, prefer choosing between a few really strong images to narrowing down hundreds of minor variations.

Food Photography By Dan Watkins - Fried Fare

Food Photography By Dan Watkins - Variety

While I hadn't even considered my minimal gear and fast-paced process on similar shoots before this conversation, the simple and quick nature of the session was not lost on the manager. In fact, as soon as I finished he asked about my availability and interest in coming back to photograph for the restaurant.

None of this is to say you should always rush through your shoots. Nor should you leave your strobe kit packed away long enough to gather dust. But knowing when and how to work quickly and simply to bring out a location's most flattering light, as well as having the confidence to know when you've got the shot and wrap things up, are definitely attributes that some clients will notice and appreciate.

Food Photography By Dan Watkins - Entree

Food Photography By Dan Watkins - Cocktail

Filed Under: Photography Tagged With: Boston, boston restaurants, dan watkins, Flash, food photography, improper bostonian, lighting equipment, photo shoots, photographer, photographic lighting, Photography, quick and simple, shooting, simple photos

Photographer Joe McNally Speaks With Tiffinbox

April 19, 2011 by Seshu | Editor & Publisher

As I mentioned a few days back, I had the honor of meeting both David Hobby and Joe McNally during their Flash Bus stop in Boston. Thanks to Adorama – The Photography People, I was able to interview them both. If you haven't seen the interview with David Hobby yet, please check it out now.

Here is the one with Joe McNally:

This wasn't the first time I met Joe. I was one of his students at his Dobbs Ferry workshops (highly recommend it, by the way) in June 2009.

I have two of his books – The Hot Shoe Diaries: Big Light from Small Flashes and The Moment It Clicks: Photography secrets from one of the world's top shooters. His next book, Sketching Light, is due out soon and based on what he has just told me in the interview above, I just pre-ordered it.

If you have any of his books or you have attended Joe McNally's presentations in the past, please comment below.

Please thank Adorama again for making this interview possible. When they say they are the “Photography People,” I know they mean it. One way you can help Tiffinbox and yourself is by ordering all your photographic gear through them. Heck, if they are the go-to-store for Joe McNally's professional needs, why not for you?

*Yes there are affiliate links embedded in this blog post.

Filed Under: Off-Camera Flash, Photography, Reviews, Video Tagged With: Boston, david hobby, Flash, flash bus, guru, interviewing, joe, joe mcnally, mass media, mcnally, photographer, photographic lighting, Photography, speaks, video interview

  • 1
  • 2
  • Next Page »

Subscribe To Tiffibox Treats!

Looking for a well-curated email newsletter that will leave you inspired and motivated about your photography business? Sign up below!

About Seshu

Seshu creates relaxed portraits of families and high school seniors in Avon, Connecticut. He also leads a successful headshot photography studio in Connecticut, helping professionals from a variety of disciplines project the very best versions of themselves. He created Tiffinbox as a way of inspiring photographers, to create better images and successful businesses. [Read More]

Email Templates For Headshot Photographers

Email Templates for Headshot Photographers

Recent Posts

  • How Capture One Changed My Event Photography
  • 10 Steps To Stay Positive In Times Of Great Stress
  • Why You Need To Read “Personal Branding For Photographers” Now
  • How To Master Your Website Content Step By Step?
  • Tony Taafe’s TNT Method For Headshot Photographers

Recent Comments

  • Stephen Davison on Are You A Business Owner Who Is Smart, But Stuck?
  • Ben A. on Don Giannatti Clinches The 8th Annual Tiffinbox Award
  • Dan on Don Giannatti Clinches The 8th Annual Tiffinbox Award
  • Donald Giannatti on Don Giannatti Clinches The 8th Annual Tiffinbox Award
  • Stephen Davison on G.E. Masana’s 6 Strategies For Wedding Photography Success
  • Naveen Kumar on Weddings In India Are More Than Being At The Right Place And At The Right Time
  • kartick on Weddings In India Are More Than Being At The Right Place And At The Right Time
  • Leonid Farbman on 6 Uncommon Trends To Grow Your Photography Business
  • Willow and Finch Wedding Photography on 11 Reception Tips To Help Your Wedding Photography
  • Web Designer Malaysia on How To Optimize Your Squarespace Website For Search Engines
  • Creastan on An Interview With Photojournalist G.M.B. Akash
  • Cindy Brown | Atlanta on An Open Letter To A Local Photographer

Become a Patron!

Copyright © 2026 · Tiffinbox · Site Design by Heather Mackan Creative · Built on Genesis